Friday, October 30, 2020

All That Glitters Pt 1

 ...is gold in this case!


I have been doing this one slowly for a while since I decided to "refine" gold from some old broken electronics I was going to throw away (Compact Flash reader, etc.). Frankly, there was not much scrap and mostly only some pins were plated with gold, but it is good enough for an experiment. I am not trying to run a profitable gold reclamation enterprise. 

In this first post, I will just focus on getting the gold "foil" separated from the other electronics. Gold is typically plated onto some components such as pins and pads and fingers in connectors. These platings are very thin indeed. They exist only over the primary copper conductors so that oxidation will not interfere with the ability of a connector to make solid electrical connections over a long period of time. Yes, gold is a great conductor, but that has nothing to do with it. It is ideal for maintaining the ability to connect. 

Silver is an even better conductor, but tarnishes easily in the presence of sulfur as we read previously here. Copper forms blue-green oxides and hydroxides and so forth quite easily. Look at your pipes. These minerals do not have the same properties of conductance and malleability and ductility (yes, that is a word). They get brittle and they don't conduct electricity. The simple solution is to plate with a few atoms of gold, much like galvanizing steel with zinc.   

It does not matter what is inside wires and solder joints and underneath the gold as long as it is meets the basics needs of good-enough conductance for a decent price and environmental impact. If the outside of a wire or solder joint oxidize a bit, it really isn't terrible because the inside is still doing its job. The connector is the only place where two things made separately need to touch and conduct from the outside.

I am getting off topic, but sometimes corrosion on car battery terminals causes the vehicle to get an intermittent connection. In this case, you clean the terminals with baking soda and water, reconnect,  and you are good. But that is not practical for hundreds of microscopic connections inside a computer. 

I should mention briefly that the group 11 metals are all excellent conductors because of a quirk that fills their outermost d-shell completely with 10 electrons but leaves their outermost s-subshell only half full with one electron. That electron is freely given up, without any interference from the other 10 electrons in the d subshell, enabling many wonderful properties of these three prized metals. You might expect that the s subshell be filled and 9 electrons to inhabit the d subshell, but it doesn't. There are some theories on why this is not the case, but the best one is "because it just is."   

This topic will likely generate lots of posts, so I'll stop here for now and explain how I made gold flakes in green liquid in another post. Then we can probably continue on to refining the gold for purity (because we can!) and possibly melting it into a button. 

Thanks for reading,

Paul


Tuesday, October 27, 2020

Long John Silver

I wanted to explore oxidation, reduction, and electrochemistry a bit more. Luckily, I stumbled across an old tarnished silver ring that my wife needed cleaning. Silver tarnish is a coating of the mineral acanthite, a grey-black compound of Ag2S. It forms on silver over time by the following equation:

    4Ag + 2H2S + O2 -> 2Ag2S + 2H2O 

As a minor note of interest, there is more H2S in the environment (such as your home) than you might think. Eggs are a source, which is why you don't use silverware to eat eggs. In any case, this ring is over 80 years old and was quite tarnished. I didn't quite realize how tarnished it was, but more on that later. Here is a picture:


Anyway, we need to reduce the silver. Ag2S contains two silver atoms that have lost one electron each (oxidized). The silver therefore needs to be reduced, adding the electrons back so that it will let go other the annoying sulfur ions. 

    Ag2S + 2e- -> 2Ag + S2-

It just so happens that the standard reduction potential of this half-reaction is 0.69V. So we will use electrochemistry with a reduction potential above this voltage to reduce the silver. 

It just so happens that zinc has a reduction potential of 0.77V. So, in theory, I can melt enough of a penny to expose its zinc core and put that in a solution with various ions. We then place the ring in conductive contact with the zinc so the electrons can flow into the acanthite. For style points, I attached a copper wire to the half-melted penny and placed the ring onto the wire. The copper is not strong enough (0.34V) to reduce the acanthite but will conduct the electrons from the zinc to the acanthite. It would have been simpler to just melt the zinc core out and place the ring on that, but I wanted to prove the conduction theory.

The electrolyte solution I used was 100ml of water with 10g of salt (NaCl) and 5g of baking soda (NaHCO3). It really doesn't matter which ions are used in the solution. In this case, the cations are all Na+. The anions are a mix of Cl- and HCO3-. This "recipe" is common on the internet but I can't see what difference it makes personally. It should work with just one or the other salts in theory.

Here is what the setup looked like:     


After a few minutes, not much appeared to be happening. I used a voltmeter to make sure electrons were flowing into the ring. They were. After a while, I decided it was working - just really slowly. I removed the ring at this point:


Aluminum has a bit more reduction potential, 1.66V. So I put some scrap aluminum foil in the bottom of the solution instead of the zinc/copper and laid the ring onto the foil:


Again it seemed to be working but not quite fast enough for my desires. 

So I decided to just pump a massive number of electrons into the ring with an actual battery. I took a 9V and attached the anode to the aluminum foil. For the cathode, I attached it to some steel tweezers. That was an unfortunate choice of cathode, but more later on that. I just needed to conduct electricity into the solution.

As you can see in this video, the reaction is vigorous but still takes some time. The sulfur ions released kept clouding my solution with yellowish material bubbling to the top. Perhaps this was sodium sulfide, as both cations in the solution were Na+. In any case, I had to keep replacing the solution. Perhaps I didn't *have* to, but I wanted to see the progress.


In the end, I decided not to completely clean the ring. It was looking pretty good and had a nice antique-looking finish with tarnish mostly in crevices. Plus I had already proven the chemistry and would need even more solution and time and to continue. Here it is:


In retrospect, that ring was very tarnished and not suitable for a simple bath solution without external current applied. Unfortunately I didn't have anything lightly tarnished that I was willing to test. Some antiques and coins can lose value if you clean them.

I mentioned a mistake of using tweezers in the solution. While they were a cheap pair, I more or less ruined them. The sulfur ions adhered themselves to the tweezers as it gave off electrons from the iron. I ended up with what appears to be a yellow-green iron (iii) sulfide (Fe2S3) coating on my tweezers. This material was very hard and I had trouble removing it with a steel file. I consider the tweezers mostly ruined for chemical use and/or aesthetics now. I should have just used a bit of copper wire and then throw that away. 


Thanks for reading,

Paul  


Monday, October 26, 2020

Magically making 3g of Salt from 2g of NaOH


This is an easy-peasy little experiment to post while bigger and better things progress. In theory (which I didn't even have to verify on the internet), I can make "table salt" by adding NaOH to HCl. I'm using 31% HCl and 100% NaOH so I am going for the big reaction. 

    HCl + NaOH -> H2O + NaCl 

Basically, the ions switch partners... making simple water and salt from two extremes of the chemical world. Since 31% HCl is not fully disassociated, technically its pH is 0. Since I am using solid NaOH, its pH is 14.

This is a classic acid/base reaction where the H+ ions from the acid form with the OH- ions from the base to form water. The Na+ and Cl- ions happily bond in the aftermath. 

See what happens when I drop one of the two grams of NaOH into the fuming HCl:


It gives a serious pop (and the solution heats quite rapidly). I should note dropping even a single grain smaller than a typical grain of sand into the solution makes a noticeable impact. Immediately the NaCl forms in the solution and falls to the bottom. It cannot dissolve in this concentrated solution.

I did not want to waste all of my NaOH to neutralize all of the acid, so when the leftover solution was removed, I did test the "salt" left behind. Here is a picture:


Sure enough it tasted like table salt and did not burn my tongue. Check. When I added water it immediate dissolved into a clear solution with no further drama.

It so happens I had ~3g of NaCl. It seems kind of magic to have more white solid than what I put in, but NaCl has a molecular weight of almost 150% that of NaOH. That is because the Cl ion weighs a little more than twice as much as the hydroxide ion (35.5 vs. 17.0 g/mol). This added weight is of course offset by reducing the density of the HCl in H2O solution.

This is a super simple and surprisingly pleasing experiment. 

Thanks for reading,
Paul


Monday, September 28, 2020

What's Eating Gilbert Grape?

I wanted to make a simple battery to illustrate a voltaic cell. Put simply, two different metals, connected with a conductive wire, are inserted into a salt bridge (sea of electrolytes) and current (electrons) flow from one to the other. Because one metal is more electronegative that the other, and the salt bridge contains both positive and negative ions, we get a voltage between the two metals and flow a current in a loop between them and through the salt bridge.

In this case, I took a whopping five minutes to get what was most readily accessible to me and measure the voltage of our cell. I found a copper wire, a galvanized nail (meaning coated with zinc), and a grape. 

The copper has an electronegativity of 1.90  and the zinc coating the nail 1.65. Therefore zinc will be oxidized (lose electrons) and the copper will be reduced (gain electrons). Current will flow from the anode (nail) to the cathode (copper wire) through my voltmeter which will measure the electrical potential difference. inside the grape, there are several electrolytes. I believe the most common for a grape is Potassium bitartrate (or KC4H5O6). The K cation has a +1 charge and migrates to the cathode (copper). The bitartrate anion has a -1 charge and migrates to the anode (zinc). Other acids such as citric acid and other ions such as sodium exist in the grape.  

Electrical reactions are as follows:

Cathode: Cu2+ + 2e- -> Cu (standard electrode potential of .34V)

Anode: Zn -> Zn2+ + 2e- (standard electron potential of -.76V)

Together the potential difference is 1.1V if these reactions are under normal conditions (sufficient concentration and ion mobility at 25C).

My voltage with a cold grape measured .871V but was still slowly climbing. When I breathed on it it would always bump up a little, perhaps because the extra energy of heat put into the system allowed for more reaction (the grape was colder than 25C). Normal conditions for a grape may be more like .9V but I can't find a clear reference for this. I picked the one fruit nobody seems to have measured and published! 


Thanks for reading,

Paul

p.s. I redid the test with another firm grape, this time at room temperature (~25C). It measured .901V. It is possible that if the grape had ripened more, the voltage could go up or down from there. It is also possible that my Thompson seedless (sultana) grape varies a bit from other grape varieties. Winemaking is basically the chemistry of fermenting grapes, which like soap and baking is a whole other profession with thousands of years or art and science involved. For now, I am claiming .9V as the normal conditions for a grape with zinc and copper electrodes. 


Tuesday, September 22, 2020

Wash Your Mouth out With... Lye?!

So this is not really a 'modern' experiment of mine. A couple of years ago I got interested in making soap from lye and various oils. I used a calculator for soap based on which oils and how much of what, etc. I made quite a few batches of different types, and most are still around today, such as this one:


They are still around for a few reasons:

1) I made a LOT of it.

2) It is fairly dense, not being full of injected air like Dial and other commercial brands. A bar lasts a long time.

3) Nobody else trusted my "lye" ingredient, so I am mostly the only user. Never mind that Dial has lye in their process too. They list the ingredient formed with lye such as 'sodium palmate' or similar. That is essentially lye and palm oil combined. They lye! 

4) I made some pretty ones that serve as decoration in various homes of friends and family.

Anyway, I will not discuss the process or recipes in great detail. Like bread making, this is an art form unto itself. It might be months before I come out the other side. Most of my formulations work really well, so it isn't that hard to make good soap. I tried just about every oil and combination thereof. I trust my soap more than Dial for keeping the 'Rona away.

So this post will be more about the general chemistry.

We start with the ever-useful NaOH, sodium hydroxide. As we know by now, it dissolves in water easily to form Na+ and OH- ions.

But you know what doesn't mix with water? Oils. They are hydrophobic as they are not polarized. Remember water itself has H+ and OH- ions floating around, both with charges.

This creates a problem. We form oils on our body, but can't wash them off with water because they don't mix. Oils are nonpolar. We need an oil to wash away the oils, but that sounds like a contradiction in terms. It kind of is except for the process known as saponification. It bonds fats and oils and lipids with an aqueous alkali such as NaOH. Heat speeds up the reaction. The result has polar metal ions (so it can dissolve into water) and also the fatty acid that can bond with other oils and grease and dirt particles that don't want to wash off in water. At a high level, think of soap as a peacemaker between oil and water.    

This can be done with KOH, for example, although I never tried it. Actually this is known as sailor's soap, as the K+ ions work better in saturated saltwater than more Na+. Just about every form of metallic 1+  ion and oil/fat/lipid have been tried. Whale blubber used to be used for soap making. Lye was extracted from wood ash. Presumably they all work, with varying properties such as how sudsy they are. 

Now you also know why NaOH has a soapy or greasy feel to it. It is literally forming small amounts of soap on your skin as it bonds to our body oils.


Thanks for reading,

Paul

p.s. Soap can also act as a surfactant to get water and things that don't dissolve it in to mix. We did this in an earlier blog post when the sulfur did not mix with water - so we added some soap and it mixed happily. Now you know the water was attracted to a metal ion and the sulfur was bonded to fatty acids. When we heated the mixture enough for the reaction, between Ca(OH)2 and S, the soap just boiled off and/or remained as a harmless bystander in our solution for further reaction between one of the products and copper. 


Monday, September 21, 2020

Overreacting to Everything

People overreact a lot these days. I'm sure you know someone who reacts to everything with extreme positions. Well, in the world of elements, that person would be sodium. It pretty much reacts violently with anything. Sodium justice will not be denied I vaguely recall dropping sodium into water as a high school student, but all of that memory is fairly hazy. I had to relearn.

I wanted to practice a little electrolysis, where I run a current through a solution and collect the cations on the cathode (positive terminal) and collect the anions on the anode (negative terminal). I had just a little sodium hydroxide available, and a really small evaporating dish, so a small experiment seemed quite possible. In fact, it was MUCH faster and easier (in some ways) than I ever imagined.

I dumped about 10mg of sodium hydroxide pellets into the dish and fired it to a melt within seconds with a blowtorch. Then I dropped a pair of nails (zinc galvanization sanded off) connected to my car battery charger into the melt. I was careful not to electrocute myself. I had the charger set on 12V/6A at first (vs. the 6V and 2A settings). I figured that 10mg would yield at most 5.1g of sodium, so this small scale experiment was plenty.

The first thing I noticed is that the NaOH made a really nice and bright yellow flame when fired directly. Yes, this is the sodium flame test. The second thing I noticed is that it tended to freeze while I got the nails inserted and the charger plugged in. The solid was not conductive enough to melt the NaOH. I needed to put the nails in and then give it a really solid boost with the blowtorch. Pretty soon the electrolysis took over and sustained the liquid solution between the nails. Electricity does not meander around the long way, so the NaOH remained solid around the edges of the dish away from the nails and the path between them.

I wasn't sure what to expect. Sometimes things take hours, but almost immediately the current meter was showing was 2-3A, I had a nice production of gas bubbling at the anode, and I could see pellets of silver liquid metal forming and then turning whitish around the cathode. When it really got going, the little pellets did more than turn white: they started exploding (like minor fireworks) and occasionally whizzing around surface of the dish. This was pure sodium reacting to air and some water formed at the anode. I had to back away and unplug the charger. I did not wish to have any burn me or react with my skin.

Note that it was raining in 80-degree plus weather as Tropical Storm Beta moves onshore nearby here. There was decent humidity in the air, at least 1% water vapor. The odds of me collecting any nearly pure sodium were low. I had a bottle with mineral oil and tweezers handy, but I was also photographing and occasionally trying to film. I was also a bit careful about picking the sodium out of the melt for fear of it reacting with the air. I managed to get a few drops into the oil, but most of it reacted more than I wished before I got it there. Still, I did get some photographs, some grayish partially-unreacted metal in oil, and a nice video or two. The one thing I never got was a video of it popping and sizzling around - I was more concerned with stopping this than filming it. I do wish I had a video record of that though!

What are the reactions involved?

At the cathode (+) nail, 2Na+ + 2e- -> 2Na

The sodium ions are reduced.

At the anode (-) nail, 2OH- -> H2O + 2e- + .5O2

The hydroxide is oxidized.

A further "reverse" reaction occurs: The Na that comes into contact with water creates the original ions and a little hydrogen gas.

Na + H2O -> .5H2 + Na+ + OH-

Here is the electrolysis is action. the cathode is on the left side. The whitish looking blobs near the cathode are pure sodium. It looked more silver in real life. If you look close you can see bubbling everywhere, ostensibly H2 gas and O2 gas and some water vapor. I can't really explain the blackish/gray collection around the cathode other than sodium formed here, presumably much of it in microscopic form. Much of it reacted with the atmosphere to turn back into NaOH, but clearly bits of it just disappeared back into the melt and cooled off. I'm not totally sure why the anode side and much of the melt turned yellow/brown. Maybe this is what the solution looks like when deprived of some but not all of its sodium. Perhaps there is some carbonate reaction occurring as well. It seemed a little darker than I expected.


This closeup shows it better, including the cooled NaOH on the sides.


And this seemed really cool to me. The cathode removed (and still a bit hot) has a bit of silvery sodium on the bottom right, still protected by some liquid that is still reacting. Note the whitish-yellow sodium hydroxide near the top and the gray that I think are bits of sodium trapped in sodium hydroxide.


Finally, here is what I collected below. It is really hard to photograph, and this is far from pure sodium. Each little drop I tried to collect turned to NaOH, some partially and some completely. None of it is mercury-like in all of its metallic splendor. Nonetheless, the grayish ones that are not fully reacted will still make a nice little reaction with water, I am told.

By the way, what is mineral oil? It is a by-product of refining that is made of carbon and hydrogen without oxygen. It is generally inert for collecting species of reactive metals and minerals and storing hydrated things like iron and opal without them oxidizing or dehydrating.

Here is my impure metal in mineral oil:


This was a quick and fairly easy experiment, despite the risks of electrocution, sodium burns, and fire. While I could have probably done better, I think it proved that NaOH really has sodium, electrolysis really works, and sodium is extremely reactive with air, water, and just about everything but mineral oil. This makes me wonder about the sodium ions in our diet, from table salt and other sources such as baking soda. That is some reactive stuff pulsing around our bodies somewhere. No wonder we don't want too much of it.  

I assume the same experiment would work with potassium hydroxide. I'll have to look that up.

Thanks for reading,

Paul


Sunday, September 20, 2020

Bismuth!!!! Pt III

This is the last post on Bismuth hopefully. I am not satisfied with my crystal growth, but unwilling to procure vast amounts of material and equipment to improve further.


These are the best crystals that I made apart from my geode method. If you look closely, you can see the stair-step pattern of hopper crystal growth in several places.

The latest geode is more interesting. This time I let my bath of molten Bi cool for 15 minutes inside a blanket of kaowool refractory insulation. Honestly, I thought it would never cool down. After plunking the above from the top of the melt, I poured the remaining liquid out and had a thick geode that still had relatively small but fairly interesting crystal growth. So as to see inside better, I used pliers to break the top edges and overburden off. This exposed an interesting simultaneous view of the silver (unoxidized) crystallized metal. Finally I sanded the top smooth. Here is what it looks like:


Here is a close up view of the floor of the geode:


I especially like the largest formation where the crystal obviously grew up and out in a spiral pattern, like a nautilus shell (which grows according to Fibonacci's mathematical sequence).

Note that even the edges are not completely parallel at 90 degree angles. The crystal lattice itself is rhombohedric and is known as pseudo-cubic because it is not exactly cubic. I wish I could explain the shape and pattern in great detail but I can't get from the unit cell of Bismuth to this in a fully logical way.

What I can explain is that the hoppered nature is clearly evident in almost every crystal. The edges grow faster than the crystal can fill in the middle. Halite (salt) is another mineral that is famous for hoppered crystals. The Bismuth cools slowly enough to form large crystals easily, but they still grow so fast (think in geological terms) that they don't have a chance to fully form inside the edges.

Fibonacci's Sequence is x(n)=x(n-1)+x(n-2). This is not a math blog but the pattern is 0,1,1,2,3,5,8,13 and so on...

Does the largest crystal obey this sequence?  No, not quite. I can see evidence of 1,1,2,3 when blown up and measured, but it falls apart before and after these four edges. That being said, I googled it and there are numerous cases of Bismuth crystals being referenced as following Fibonacci's Sequence. I think, though, that it may be an assumption to describe a given crystal. I am not sure a scientist would make this claim. But nature does have its patterns, and crystals are at least related in this sense.

The unit cell for Bismuth, the smallest pattern that replicates, has two axes the same length, and the third in-between two and three times that length. Atoms are so small that these distances are measured in Angstroms. Still, that could help explain ratios that may look similar to 1,1,2,3...

Now, there may be something else intriguing related to the unit cell. There are three angles in the symmetry of the Bismuth unit cell, between the axes whose lengths are discussed above. Two are 90 degrees and the third is 120 degrees. I definitely see angles close to if not exactly 120 angles in numerous crystals towards the center as the edges formed. I am not sure if they are related, but it seems more than a random coincidence as it is frequent and far from "cubic."


If anyone can shed more light on these patterns, I would appreciate a comment.

Thanks for reading,

Paul


Thursday, September 17, 2020

Catalyst

I've always heard the term catalyst and wondered how they work. The most common term people know is probably catalytic converter (a thing in your car that improves emissions) which uses Platinum and/or Palladium as catalysts. People used to steal them to try to extract the precious metals. Maybe they still do.

I generally understood what a catalyst is, but wanted to experiment and see them in action. I thought I would pick the very well-known and widely understood metal oxide added to hydrogen peroxide to speed its decomposition into water and oxygen.

    2H2O2 -> 2H2O + O2

It turns out that it is very well known, especially with MnO2, but remains an active area of research for the exact series of reactions involved. The best-looking answer I found on the internet initially for MnO2 was completely wrong as it left MnO as a product. A true catalyst speeds the reaction but is unchanged; it is not modified by the completed process even thought it may be temporarily modified during the reaction. You should be able to reuse the catalyst. Luckily, I don't have to take my car down to Jiffy Lube for a refill of Platinum.

For kicks, I had some Fe2O3 (hematite) laying around, and decided to bake-off the natural decomposition of H2O2 vs. with MnO2 vs. with FeO3. I had done no research on hematite as a catalyst for the reaction - I just thought it might work. In retrospect that was probably silly as Fe2O3 is abundant and cheaper than MnO2, so I would probably have found more on iron oxides as a catalyst than manganese oxides initially if it worked just as well.

OK, so I dumped some hydrogen peroxide into two beakers. Not much happened. There was an occasional bubble. Not enough for me to have even thought a reaction was occurring, but sloooowly. Then I dumped some MnO2 into one and it went crazy making oxygen gas. The beaker also became very warm. This is clearly an exothermic reaction! Next, I dumped a bit of red iron oxide into the control beaker. I didn't observe much. There was some bubbling, but I'd have to compare to video to try to determine if it was any faster than before.   


What is going on with the MnO2 reactions?? I was a bit disappointed to find no good reference on this on the internet. The ones I did find were vague or detailed but clearly wrong. A catalyst creates a series of reactions that end up with the catalyst unchanged, the same products (water and oxygen here), but has a lower activation energy so that the reaction can be done faster with the same energy or with less energy. In my case, I was adding no energy to the system beyond room temperature (which is what the hydrogen peroxide was stored at in the first place). I expected the rate of reaction to change.

Here is a handy artwork I made to show the H2O2 reactant, it's formation enthalpy, the normal activation energy, and the products with the exothermic release of energy (delta H) calculated from the formation enthalpy of liquid water. Since the activation energy with MnO2 is known, I charted that as well and tried to approximate a couple of reactions along the way in a second line on the diagram. But later I read that there could be five reactions involved.


After trying much math and good searches, I did feel better to finally find a recent academic paper which states that the exact series of reactions is unknown and proposes five reactions as a possible solution. When you are having trouble finding a solution, it is always nice to know what you thought should be easily discoverable is actually unknown to science. I feel less stupid. One thing I so know is the "slowest" of that series of reactions must have an activation energy of 58KJ/mol to match overall lab results for the catalyst. But I'm not going to repeat the research in detail here.

So what about my iron oxide (with Fe(III) ions instead of Mn(IV) ions)? Further research uncovered that this is also being actively studying for potential performance in different environments (temperature, pH level, etc.). It does seem that the effectiveness of iron oxide is not nearly as good as that of MnO2. I noticed what appears to be some bubbling at a greater rate than before, but nothing worth writing home about.

I once visited a vast field of manganese oxides in New Mexico. I have been to mines in California and other places. The ocean floor is littered with manganese oxide nodules. I would love to have collected some of these natural minerals (pyrolusite - MnO2 - among others) and try them out. But these things are mostly just ugly black and so I didn't bring much back or keep track of it. Maybe some day I'll run to the Quick-E-Mart and buy some hydrogen peroxide if in the areas again. Like taking ore to the coal mine, or Mohammad to the mountain, it seems that taking a bottle of liquid to the ore field is the easier task. I would pour it on the black ground and it should fizz wildly. In the process I water any plants and add oxygen to the New Mexico sky.


Thanks for reading,

Paul


Tuesday, September 15, 2020

It's a Liquid, it's a Solid, it is Ferrofluid!

I attempted to make my own ferrofluid. I failed. First I bought some printer toner but it was not magnetic enough. So then I bought more toner, this time magnetized for check printing (MICR toner). I mixed with vegetable oil at different thicknesses. I made a magnetic suspension fluid but it did not form cool shapes quite like I expected. I'm not sure what the problem was, but I made a HUGE mess and spent a week trying to recover my beaker and magnets, etc. I decided that I would break my personal rule and buy the stuff ready-made. I will not share my formulations as they all failed to impress me and made a massive mess. If you have never dealt with printer toner, I don't recommend you start now. It is ink, and simply opening a bottle of it causes and ink cloud to form and settle on everything around it. Someone once joked that if you sneeze, you may have to buy a new house.

What is ferrofluid? Well, as NASA envisioned it, it is a liquid that can be controlled by magnetic fields. So it has properties of two phases, liquid and solid. In order to make ferrofluid, you need very small (10nm or so) particles of magnetite (magnetic iron oxide), polarized in a surfactant (like soap) and suspended in a carrier liquid. The carrier and surfactant can be one substance in the case of thin oils like mine, but NASA's formulation was hopefully more sophisticated.

Since I skimped on cheap toner, maybe my particles were too big. 10nm is really small. Again, I'm not really sure. I know from a job I had once that growing consistently small crystals on that scale is quite hard. You have to stop growth before the crystals are even visible.

Here is a picture of my new purchased fluid above a medium sized rare earth magnet:


It is a big hard to see black against black, so here is a view of the same picture where I edited the light and contrast:


Note the characteristic spikes arranged in a beautiful 360-degree flower shape. The shape corresponds perfectly with the magnetic field, as expertly drawn by me below. Note the field follows this pattern in 3D, not just to the right and left of the magnet as in my drawing.


And here is another picture with a smaller and therefore weaker magnet:


Note the field is weaker, so it can sustain fewer spikes and they are tending to bend down according to gravity and the smaller shape of the magnetic field.

You may be wondering why the spikes form so precisely. I did, so I looked it up. The particles are so small as to move about and bounce off each other randomly in the same way molecules do in liquid. This is known as Brownian motion. Thus the liquid can arrange itself perfectly with force fields according to probability's directions. As we showed in the magnetic field diagram, the spikes correspond to these magnetic field lines in 3D. However, they are limited by gravity and surface tension. The tips of the spikes are the point when the opposing forces are equal. The spikes grow longer with a stronger magnetic field. The direction of gravity can affect them. The largest and sharpest spikes are formed when surface tension of the liquid is minimized. 

If you wish to try something similar and not buy the stuff or figure out how to make it, a quick and easy thing to do is to dump some iron filings on paper or glass above a rare-earth magnet. Don't let the filings get on the magnet! The much-bigger filings align with the magnetic field in a similar way, generally showing the magnetic field shape. They cannot reposition themselves ideally because they are not small enough, not suspended in a fluid, and make physical connections with each other (like little magnets stacking themselves upon each other).


One last thing. What is magnetism? I am oversimplifying this because it is kind of complicated and honestly I don't fully understand it yet. For our purposes here, some materials have unpaired electrons. Iron is one such substance. Another is Magnetite (due to a combination of both Fe(ii) and Fe(iii) cations in its molecular makeup). Paired electrons cancel out a magnetic property known as spin. Unpaired electrons retain this property and are attracted to electromagnetic fields. While electromagnetic fields are usually the realm of physics, I guess my point here is it all comes from the chemistry of the substance.  

Thanks for reading, 

Paul

p.s. I kind of butchered some of the science for simplicity. In reality, what I am calling magnetic is paramagnetic (other than the magnets themselves). Paramagnetic material like iron filings and this ferrofluid can be attracted to magnetic fields spontaneously. Paramagnetic material has one or more unpaired electrons. Paired electrons oppose each other's "spin," and therefore magnetic properties. This means the bonding of molecules and even between molecules in crystal lattices makes a difference in whether electrons are paired, and therefore, whether they are paramagnetic. O2 is paramagnetic but N2 is not. Without getting into Molecular Orbital Theory (MOT), it is easiest to determine the elements and ions. Iron has four unpaired 3d-shell electrons (according the Hund's law). Iron +2 or (or Fe(II)) also has four. Iron +3 has 3 unpaired electrons. In a compound, note iron oxides hematite (diagmagnetic) and magnetite (strongly paramagnetic) are determined by MOT and not just their metal ions by themselves. A common question is why copper, silver, and gold are not paramagnetic. All three line up in group 11, meaning they have one unpaired electron, but the large size of the atoms means the many filled shells' diamagnetic properties overcome the attraction of the one unpaired electron. I believe MOT is beyond AP-level Chemistry.


Friday, September 11, 2020

The Black Snake

I wanted to make the Pharaoh's Serpent, but then I read how toxic it is and I had no plan to manage that properly. In researching this, I saw the much less cool Black Snake experiment as another type of intumescent reaction. An intumescent is a substance that swells with heat exposure. These can come in handy as fire retardants. Both "snake" reactions are of this type where a substance appears to grow out of a hole as it expands. I have never been to Diwali in India, but apparently this is one of their favorite firecracker types. Personally, I have no recollection of these fireworks at all (but also am not that experienced). 

The way the reaction goes, sucrose (powdered sugar)and sodium bicarbonate (baking soda) are mixed in a  4:1 ratio, added on top of sand soaked in a fuel such as lighter fluid (butane), and then the fuel is ignited. In my case, I used isopropyl alcohol as the fuel. Fairly quickly, several reactions start at once:

1) The fuel combusts, making carbon dioxide and water vapor and - most importantly - heat.

2) As the baking soda heats up, it releases carbon dioxide gas and water vapor as it decomposes to sodium carbonate. This is known as thermal decomposition, and is a key reaction in baking.  

3) The sucrose combusts much like the alcohol, again creating carbon dioxide and water vapor; however, some of the sucrose forms carbon. Remember burning creates lots of different reactions. See below.  

C12H22O11 + 12O2 -> 12CO2 + 11H2O

C12H22O11 + 11O2 -> 12C + 11H2O

So what happens is pure carbon and sodium carbonate are formed as solids, but pushed up and out by the carbon dioxide gasses. It cools as a long continual "ash" that can look like a black snake slipping crawling out of a hole.

I tried this, but it wasn't hugely impressive. I think my dish was too small and after a while the flames were choked out by the sand losing its exposure to air. It could be that I just did not use enough reactants to get a long reaction and product. I went for a relatively small effect as I didn't necessarily want a huge long pile of ash and I had limited 91% alcohol to conserve. Perhaps I ran out of that and lost the chain of exothermic reactions.

Note that this is super kid-friendly except for one big caveat: the fire. The biggest mistake made is people add alcohol to the flame and it splashes and spreads flames which have been known to badly injure people. Never do that! Of course, in general it is easy top burn yourself or something else with fire. That much is obvious. I'm not sure it is much more dangerous that barbecuing, however. The only real difference is we are adding gasses from within to expand the ash.

This is what my snake looked like when it went out after about 10 minutes.


As you can imagine it would look better if longer and thinner. I think my dish was too small. The video is not quite impressive enough to share. Some videos online are sped up. Nevertheless, you can probably play with the process a bit and get much better results.

I thought about using my new ash for gunpowder, but it contains a fair amount of sodium carbonate, I think. I'm not sure what that would do to the reaction. All of these experiments involving an oxidizer and sugar or charcoal are very similar reactions. I might be better off just burning sugar directly to get carbon. The only twist we really added here, chemically, is the decomposition of baking soda. I think it might have also slowed the burn rate a bit by displacing some oxygen with carbon dioxide.

Thanks for reading,

Paul


Monday, September 7, 2020

Battle of the Exothermic Redox Reactions

We've covered both thermite and "rocket candy." Here is a video of each, with 5g of thermite and 6g of rocket candy.

Here is the thermite (iron oxide with aluminum for fuel).


And here is the rocket candy (potassium nitrate with sugar for fuel):


A few things jump out at you:


1) The thermite is very hard to ignite (24s), but the sugar candy is pretty easy to ignite (<1s).

2) The thermite releases more energy in general.

3) The thermite releases more energy in the form of light.

4) The sugar candy has a longer burn (4s). The thermite is done in 2s.

5) The sugar candy releases many more gasses. 

6) If you can see in the videos, the thermite melts its aluminum cup and the sugar candy does not.


It goes without saying that sugar candy is a better propellant. Thermite actually is not a propellant at all; solids react to create solid products. Sugar candy has a longer burn with more emissions. This is what you want for thrust. Additionally, the thermite is just too hard to ignite and burns too hot to propel an actual vehicle.

That being said, the thermite can be used for welding because it leaves molten iron as a product. Since it carries all of its own oxygen in the iron oxide, burns so hot, and has no gas propellants, it can even be used underwater.

The application of chemistry is using the right tool for the job. Changing an atom here or there creates very different chemical properties and reactivity. 


Thanks for reading,

Paul


Yes I did it, Plasma Pt II

I mentioned that my daughter was home.  I wanted to show her the grape plasma, bit it did not work because the grapes were a little ripe and just split immediately upon heating. It took some convincing, but my wife allowed a quick and simple creation of a much more impressive plasma display. If my daughter were not home, she would probably have not agreed. So thanks for that! 

Let's go straight to the video because it is impressive:


We have created much more plasma that the grapes did! I have a lit match on a watch glass, held in the air by a toothpick (so it did not go out immediately), contained in a beaker. Then I pressed go on high and filmed. The plasma jumps around inside the beaker as the microwave goes through hot and cold spots of radiation. Make sure the volume is on as this makes an impressive hum. 

I analyzed the audio from the plasma and it seems to be regenerating exactly 420 times per second. I had expected 120 time per second based on NileRed and some other internet content. Yes, 120Hz is the frequency of rectified AC power but I don't think that matters. The microwaves themselves are in the gigahertz range. It seems to me that the principle of the microwave is that hot spots will form standing waves of electromagnetic energy according to the resonant frequency of the mechanical chamber itself. Perhaps that is around 420Hz. What really surprised me was how truly consistent the frequency (to the Hertz). See this analysis for one:


It is wonderful that I can analyze the audio with a free app on my smartphone. Ten years ago I would need a lab full of equipment for much of what I do on my phone now.  The number at the top is the peak. Every time I play the video I get audio playback up to 10KHz. That number may just be a cutoff given the sampling frequency of my video. I'll skip the math and physics lecture here. The point is that the dark red line is the peak signal during the plasma generation. It is a pretty narrow and strong band of sound. Two video playbacks are shown above, with ambient noise in between. For whatever reason, I get very little sound at 120Hz and a clear and consistent peak corresponding with the plasma generation at 420Hz.

Luckily I cut the experiment pretty short. I saw no real purpose in keeping my plasma alive for multiple rotations. I did not want to risk fire or any other damage. The plasma can easily reach 10,000 degrees F and much, much higher. Let's just say that my breaker cracked from the heat in only a few seconds, and it should be good up to 1000 F or so. I often use a blow torch directly on the special glass at that temperature. I don't recommend it, just like I can't recommend this experiment for others. If my beaker had fallen apart instead of just cracking, the plasma would have been free to roam the microwave and melt anything it came near. The fire risk was probably low because I had my hand on the off button, but microwaves are built out of materials that quickly melt at these temperatures. NileRed demonstrated this, so I don't need to.

To paraphrase a baseball announcer, my beaker died a hero. My microwave still works and I am still married.

Now, what was the gas that we heated to the fourth state of matter? 

Old matchheads (not safety matches were made of mostly white phosphorus). I, however, grabbed whatever free book of safety matches was available in the drawer next to the microwave. I didn't really plan this experiment, per se. I did the whole thing in just a few minutes. Wikipedia says safety matches are mostly potassium chlorate. Perhaps I'll do a whole experiment on match heads now. Chemistry begats more chemistry. I figure there was a fair bit of air that was ionized as well as some carbon gasses from the paper of the match. 

Whatever, I had neutral gasses from the flame, and I zapped it to kingdom come with a strong electric field (apparently 420 times per second). I ripped the electrons off of potassium ions and/or carbon ions and/or whatever else there was in air, including Nitrogen, to create a free cloud of electrons that emitted yellowish photons in the form of light energy. Most likely the dominant yellow color is from sodium ions that came from sodium borosilicate beaker glass. Shout out to NileRed for doing some good experiments to indicate this.

If you saw his video, I was thinking the beaker glass was causing his Na spike while he went super-technical in search of chemoluminescent reactions and so forth.  I don't know 1% of what he does, so I figured that beaker glass is somewhat related to soda-lime glass. He knew enough to seek far more complicated theories before determining the simpler truth. When you are at this high a temperature, all of the normal rules don't necessarily apply. Your beaker may not be inert. Super strong Nitrogen triple bonds break and this mostly "inert" gas reacts with oxygen to form NO2. Weird, wild stuff.

I declare success and a truce in the plasma war before things become too heated.

Thanks for reading,

Paul


Jump Up!

My daughter was home briefly and told me she wanted to do an experiment she saw from coolchemistryguy. Unfortunately he explained nothing in his video but looked cool doing it. So I made her do six experiments. This is the one she wanted to do, starring her. I'll explain it.

First, we melt the bottom of a birthday candle and affix it in place at the bottom of a plastic tub. We fill the tub with water, but not above the candle wick, and add some food color for a better viewing experience. Then we take an empty wine bottle and add a little bit of 70% isopropyl alcohol, the same used for hand sanitation everywhere. This time 90% is not required. We roll the alcohol around a bit in the bottle, just enough for vapors to fill and coat the inside. With the candle lit, we place the bottle over the candle and into the liquid. You don't want the bottle to form a seal at the bottom, so if possible keep it down in the liquid but not completely against the bottom. The liquid should rush into the bottle with surprising force, especially if you have done this without the alcohol.  

Here she is doing the honors:


Pretty cool! The reason this works is that the candle heats the air in bottle, and that causes it to expand, when placed into the water the bottle cools quickly and pressure drops. As the Ideal Gas Law states, PV = nrT, or more simply, pressure and volume are proportional to temperature. As temperature rises, volume expands and pressure increases. As temperature falls, volume and pressure reduce. So as the pressure drops back down and volume of air in the bottle reduces, it creates a suction that brings the water into the bottle.

Normally this is slow and a bit boring, but alcohol spices things up. The vapor in the bottle is flammable, and when exposed to the flame of the candle, expands rapidly and forcefully (although mostly unnoticed and unseen). This forces most of the gas out of the bottle, which in turn creates a much stronger suction when it cools. 

I could not see the gas in the bottle ignite until I looked frame-by-frame. This picture captures a hot (blue) flame shooting momentarily into the neck of the bottle.


I believe the wine bottle worked better than others we tried because the thin neck creates a venturi, speeding the liquid into the bottle. The other way to think of it is that the suction is the same, just over a much smaller area than a mason jar or similar.

This is a great thermodynamics (and fluid dynamics) experiment suitable for kids (well, without the alcohol it is about as safe as a 1st birthday cake).

Thanks for reading,

Paul


Saturday, September 5, 2020

The Fourth State - Grape Plasma

We are going to make plasma, the fourth state of matter after solid, liquid, and gas. I have seen vast machines use plasma etching and vapor deposition when touring LCD factories making TVs and computer displays, but I wasn't up on the science of it and didn't fully understand that part of it. So I have wanted to better understand the states of matter and their transitions. In math and science and computer programming, the diagram below is known as a state machine, and may be used to design a vending machine or calculator for example. In this case we are mapping out the known states and transitions of matter. I assume by now you are generally familiar with melting, freezing, boiling (vaporizing), and condensing (like fog or dew). We talked about sublimation in the cloud chamber experiment when frozen carbon dioxide went directly to a gas without passing Go and collecting $200. Here is the diagram which I labored over for many hours with precision tools:


Not everyone is familiar with plasma. You may have heard of plasma televisions. You definitely know the glow of neon lights and bright flash of lightning. The sun and other stars contain plasma. You have definitely seen it but likely did not process it as a fourth state of matter. When a neutral gas is superheated it can change into ions (atoms with electrons removed) and free electrons, which is basically a conductive substance that can be controlled with magnetism and electricity. The formation of plasma is called ionization. When it cools back to a more stable gas state, that is known as deionization.

Trivia: some scientists suspect that plasma is the most abundant form of matter in the universe. Nobody really knows.

More trivia: St. Elmo's Fire is a glob of plasma that hangs about occasionally and is known to pilots and mariners.

Thanks to a video from NileRed, I decided to make my own plasma in the microwave. My wife would not be happy if I destroyed the microwave or burned the house down, so I went for 'small but visible' plasma using two grapes which she had just bought. There are other more impressive way to form big bright balls of it, but we will stick with grapes for now. I should say don't try this at home...  

It has actually taken science awhile to explain grape plasma. Original theories were wrong. I'll try to explain very briefly what scientists currently say is happening. The grapes being full of mostly water absorb the microwaves and heat up quickly. Two of them very close to each other (touching in my example) form one single heat center in between the grapes. This spot get incredibly hot, so hot that it ionizes hot gasses escaping from the grapes. We see sparking much like metal in a microwave, and this is the plasma shooting its free electrons out like little bits of lightning.


In case anyone ignores my admonition, don't do this to the point that the grapes catch on fire. Thirty seconds on high is probably more than enough. Trust me, the grapes get really hot quickly. Be careful touching them after the experiment. Use a watch glass or similar dish to hold them. You can eat them if you want (for some reason this is a common question) but wait til they cool. Use a rotating plate as microwaves have hot and cold spots due to microwave superposition (just like our light being cancelled out in the bismuth posts). The physicist Faraday says you can cut a small hole in your microwave for better filming, but I don't think it is worth it. Don't let your dog eat the grapes, cold or hot. Yes, that is my dog reflected off of the microwave in the video, hoping to get food out of this somehow.

This is what the (very hot) grapes (with a little juice splatter) looked like when done. You can easily see the heat center where the plasma was generated.


Thanks for reading,

Paul


Friday, September 4, 2020

Bismuth!!!! Pt II

I'm still slowly working my way towards making nice Bismuth crystals. In the mean time, I have made some small experimental progress. It seems there is little information online about this, possibly because some folks have healthy businesses selling crystals. In fact, I have found some information on the web that is exactly wrong.


I have limited Bismuth to work with currently. Above is a 2" diameter geode on the left, filled with mostly blue oxides and a number of beautiful hopper crystals that the photo does not clearly show. On the right is a "swish" of a smaller amount of molten bismuth in the same sized crucible.

We have three things to consider here: color, size of crystals, and the habit.

Let's start with color. I personally think any color is nice and care more about the size and habit, but it seems color is a major factor in desirability for others. I mentioned earlier in Pt I that the colors are iridescence caused by oxides forming as the metal cools. Different thicknesses of this oxide layer yield different colors as it causes certain wavelengths of light to be cancelled out and others to pass. That is physics.

How do you control the oxide thickness? I can think of two primary ways:

1) Expose to more or less oxygen. The more oxygen, the thicker the oxide. No oxygen exposure at all yields no oxidation and you get the metal itself. I don't recommend exposing pure oxygen to molten metal, but the amount in the air that the melt is exposed to will help determine oxide thickness (think of it as a limiting reactant). When using a blow torch, an oxidizing flame should provide more oxygen than a reducing flame. Humidity is also able to give up its oxygen with enough heat. I suspect Colorado and The Gulf Coast, where I am, would show different behavior due to humidity and amount of oxygen in a given space of air.  

2) Control the heat. The longer it takes to solidify, the more opportunity there is for exposed surfaces to form oxide layers, so thicker they will be. In the small experiment on the right, I mentioned that I "swished" the molten metal around in a circular pattern until dry. While the edges contained the bismuth that cooled last, the part ultimately exposed to air was only momentarily molten as it had already cooled a bit. Clearly a quicker cooling gives the golden color. There are a number of ways to control the length of time to cool. These include amount of material, how hot it is heated to, the environment that it cools in (including insulation), whether forced air or water is used, and so forth.

How does oxide thickness relate to color? I read online that it follows the electromagnetic spectrum. We probably remember the weird acronym ROYGBIV, or if you are British, the more straightforward, "Richard Of York Gave Battle In Vain," which also helps you remember your history and Shakespeare all at once.

The source light matters, as only that light is possible to be reflected back from the metal under the oxide layer. Your eyes also matter since we "loosely" have receptors for red, green, and blue. A television does not make yellow wavelengths, but makes our brains think it does by emitting green and red light. In nature, that could be yellow, or it could be green and red. We don't know, our brains get the same signal. Just ignore that if it doesn't make sense; we are combining chemistry, physics, and biology here. The point is that color we see is usually not a single wavelength and is very different than mixing crayola colors in elementary school, where we all learned that blue and yellow make green. Expect when it doesn't. 

Anyway, I believe that the golds cool the fastest (forming thinner oxides) and then the reddish-golds (almost a copper color), then purples, then blues, and then a pale green. Since they are all metallic, they are hard to describe. I do not believe it corresponds directly to the spectrum, in either direction. I am sure that the silver color means little to no oxide layer so almost everything is reflected back. I'd love to do a formal study on this, but lack the equipment. Even if I am wrong on the order of the colors, you can play with temperatures and oxygen richness of the environment and make a variety of colors. That much we know.

What is the exact oxide formed? Bi2O3. Here is the reaction with humidity:

2Bi + 3H2O -> Bi2O3 + 3H2

You could possibly bathe your colored crystals in water with CO2 and change the chemical composition of the external layers. I am not sure what that would do to the iridescence.

OK, let's tackle size. This one is pretty simple. The longer it takes molten material to cool, the more chance the crystals have to form and grow. So get it very hot, and then try to cool it as slowly as possible (except for and parts you are trying to color a certain way). A bigger pot of molten Bi will take longer to cool than a small one (and givens more room for growth too). You may be able to allow for slow cooling by keeping a nominal amount of heat on (not enough to melt it). You may also consider  insulating the molten material so it cools more slowly. It is just like Lego building. The more time you have, the bigger you can replicate a cubic structure out of the same size blocks. This is true for all crystals, and explains why you can't find any decent igneous crystals in Hawaii. The good stuff is way way below where the magma is cooling slowly for millions of years and the molecules have the time they need to find their friends and create large structures. Up top, the volcano spews out billions of billions of atoms regularly and they immediately cooled in the air and water, leaving lava rocks instead of mineral crystals.

Now we learned in the previous post that crystals form around a center of nucleation. Bismuth is good at providing this wherever it cools. Maybe it is the side of a dish. More likely it starts with a film then crust across the top where exposed to air. This is just what our sodium acetate trihydrate did. In this case, crystals will grow down from the top into the liquid Bismuth. Getting them out at the precise time without damaging them is tricky. My experiments show that I have not tackled this yet. My geode was nothing but a partially cooled dish of Bismuth with the molten middle dumped out. The crystallization started on the edges of the crucible where it cooled more quickly. Just like our volcano, the center of the melt will cool last.

Finally the most interesting thing to me about these crystals is their hoppered psuedocubic habit. Psuedocubic is a big word that means the crystals are rhombohedric in shape, but so close to 90 degree angles that it looks cubic. So we get a bunch of shapes that look like little buildings, some tall, some short, some long, some almost perfectly cubic. These shapes are simple, pleasing, and easy to recognize. What is not simple, and really wows people is the hoppered element. Hoppered crystals have grown so fast that they can't fill-in their centers as they expand. So they end up leaving stairstep vacancies as they tend to spread along their edges. It is really an amazing phenomenon. While my geode is full of nice obviously hoppered crystals, it is hard to photograph. You might see a little bit of it if you look carefully. I hope to make some bigger crystals in the future that show this more clearly. I will likely grow these from the surface down into the melt with a larger container and more bismuth.

Now you may wonder why Bismuth forms psuedocubic crystals and copper and silver and gold form dendritic shapes. I do, but I don't know yet. Maybe that can be in Pt III along with better crystals.

Thanks for reading,

Paul


p.s. Ignore anything about Bismuth being radioactive. It is so stable that they just recently proved it is technically radioactive. About .0000001g out of 100g will decay away every 14 billion years. I'm not really worried about that. My measurements are not that precise and the age of the universe is less than that. 


Monday, August 31, 2020

Super Cool

I'm going to start this experiment with a technical description of what we are doing here. I had to divine this before I could make the wildly different and terse internet "recipes" work. A few little tricks required my knowledge of what was happening as it relates to crystallization, enthalpy of fusion, and the exact reaction entailed. I had tried previously but failed. I had a good idea of what was happening, but not good enough to fully anticipate next steps along the way. It turned out to be a bit tricky, but I think my description here should be complete enough for others.

I have to admit this is the most amazing experiment that I have done, even more than I anticipated. If you want the Gee-whiz without any technical details, like an old BASIC program, GOTO EXCITING_STUFF_HERE

Otherwise... 

BORING STUFF HERE:

We are going to supercool a solution, and then apply a seed crystal, causing it to almost instantly crystallize the whole liquid into a solid and release heat upon fusing. 

First, we create a solution of sodium acetate in water. No big deal, every kid knows what happens when you mix 3 tablespoons (54g) of basic baking soda and 3 cups (750ml) of 5% acidic vinegar. You get a reaction with a lot of carbon dioxide bubbling, so you have to add the vinegar slowly.

5% Vinegar has 5g of pure acetic acid (CH3COOH) for every 100ml of solution. You can adjust the amount for your concentration. 

Baking soda is NaHCO3

At this point we have created CH3COONa (sodium acetate) dissolved in a bunch of water with a big release of carbon dioxide.   


After it is fully reacted, put the pot on the stove on low heat. You need to get the solution well above 136 degrees and leave it there, while evaporating most of the water away. Our goal is a simmering solution (less than 212F, say 190F) with exactly enough water left to form three water molecules for every sodium acetate molecule. Exactly, more or less. :)

CH3COOH + NaHCO3 + 2H2O -> CH3COONa*3H2O + CO2

Why 136 degrees? That is the "freezing temperature" below which sodium acetate trihydrate (a crystal with the three waters included) can form. In other words, this compound is normally a solid at room temperature. By keeping it hot, we can keep these crystals melted as long as we have enough water in our solution. 

Why 190F? Water boils at 212F, so our solution should boil just above that point. It is hard to see what is going on in your dish with a raging boil. Also, we will need to cool it later, so overheating seems unnecessary. OK, I warn you now, we are getting rid of about 90% of the water, and it has to be done precisely. This can take hours and frankly I don't have the patience. My shortcuts usually led to failure.

This one did work. I found that I could bring it up to a low or moderate boil periodically, but needed to check my volume and make sure my solution was still clear by turning down the heat every few minutes. Once you are below a cup of solution, you should watch more carefully and avoid the boil. Note that white crystals start forming on the sides of the pan early on. This is normal and expected. Ignore them.

After an hour and a half or so I saw an unexpected white powder forming in the bottom of the solution. I have no idea what this was. In theory, my 1 TBL for every 1 cup formula gave me about 2g too much baking soda. Did this somehow appear when there was no longer enough water to dissolve it? I think so. I had it happen twice, and I am pretty sure it was not crystallization. If it was not baking soda, it was most likely anhydrous sodium acetate which is not the exact chemical structure that we need.

The first time I made the mistake of thinking it was the desired crystallization and proceeding to drain and filter my solution for cooling. Don't do this. The second time I drained the solution and filtered the white powder out, but then rinsed my dish and put it back in there to keep simmering. This is what to do if you get the white powder formation. I suppose I could have also added some vinegar until it went away, but then I'd have even more water to evaporate away (assuming a healthy dilution).  In any case, the powder never came back or reformed. It is possible that I could have proceeded to crystallization (described below) while the powder hung around. I am not sure as I did not test this.

About two hours into the process, on a nice 190F simmer of my especially clear solution, I noticed crystals forming. The key is knowing what to look for and catching it quickly. The way they form is a small clear crust just beginning to form on the surface of the water like a scum. You really can't miss it, it is not like a precipitate down in the solution. Now when this happens, act immediately. Turn off the burner, and slowly pour the hot solution through a filter into your clean dish again. 

It is critical that the dish be cleaned well after prior uses. I used a funnel and a coffee filter. Still, it is hot and the filter drains slowly. You want to catch any impurities or crystals and keep them outside of your solution. In my case, I had a nice clear yellowish liquid, between a quarter and a third of a cup,  that had cooled to about 150F degrees (this needs to stay above 137F for now). Quickly I added plastic wrap to the top of my dish (to prevent further evaporation) and carefully placed it into my refrigerator where it would not get bumped. Now, you can use room temperature to supercool the solution, but the fridge is faster and we are 2+ hours in at this point. 


Supercooling is lowering the temperature to below the freezing level but without fusion (crystallization) occurring. Think water at less than 32F but not frozen. We do not want the phase change to solid to happen just yet. In this case, getting it to room temperature (about 60F below the point of fusion) is fine. Unlike supercooling water, we don't need to get it below 30F, and that is one reason this crystal is perfect for our experiment. Another reason is this chemical has a high latent heat of fusion, which means that it releases a lot of energy upon fusion (or takes a lot to melt). A supercooled liquid can "store" the energy required for crystallization to be released later in the form of heat. Obviously, a "frozen" phase of any substance is in a lower energy state than a liquid or gas where parts are expanding and moving about (more disorder is higher entropy).   

Another thing I had to learn is that heated water is a better solvent than unheated water. By heating our solution to 190F, we can dissolve a larger amount of chemical in our solution than at room temperature. When the solution is fully saturated then cools without crystallization, it becomes supersaturated. The liquid contains more dissolved chemicals than would have been possible without heating. This was an ah-ha moment for me, as I realized it was critical that we fully saturate the heated solution and no more. We needed crystals to form (the moment of full saturation) before stopping the dehydration.

At this point, taking time to clean the dishes while the solution supercooled in the refrigerator, I was ready for the good part. The solution still looked clear and liquid, and I was able to move it to the counter without accidentally kicking off the crystallization. Supercooled liquids are not very stable, and even a bump can start their fusion sometimes. What works best is nucleation, or the introduction of a "seed" crystal to which the remaining chemicals can readily bond. I was prepared with seed crystals scraped from the bottom of the pot after pouring out the final solution.

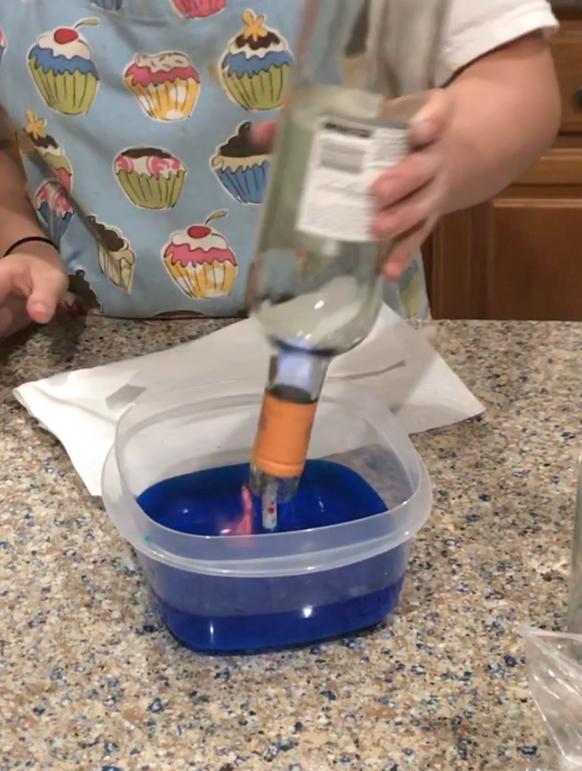
While I had planned to drop a seed crystal in, I wanted to measure the temperature of my supercooled solution. So I inserted the tip of a candy thermometer. Before I could read a temperature, a reaction formed around the tip of the probe and started expanding outwards as white crystal. I had provided just enough nucleation in the form of disturbance and/or the introduced probe. I quickly pulled the thermometer out to get my camera, and the reaction stopped, leaving me with  a nice seed on the tip of a thermometer probe. What luck! While I could not get a temperature of the solution because the crystallization releases energy in the form of heat, I had a nice seed on the end of a probe that could measure the heat of the reaction.  

Lights, camera, action! You can see the rest below... I should note that the heat of my fusion was 120F. It makes sense that it was not quite enough energy to melt it again. 

EXCITING_STUFF_HERE:

This experiment "supercools" a liquid. When I dip a bit of the type of crystal ("hot ice") that should form, a beautiful 3D upside-down chrysanthemum-like growth initiates and completes in less than 20 seconds, leaving nothing but a warm solid mass of crystals in my bowl. It is like a magic trick. Here it is in video:


And here is a closeup of the solid. The solution shrank a bit to fill almost exactly 1/4 cup of solid in the end:


And here are recovered crystals outside the dish:


Isn't that super cool?

Thanks for reading,

Paul   

All That Glitters Pt 1

 ...is gold in this case! I have been doing this one slowly for a while since I decided to "refine" gold from some old broken elec...